Hi Sis,
Evelyn actually fits in one of the outfits I made her!!! Naturally, I had to dress her up and do a photo shoot. This is the Best Sunday Baby Dress that I made and blogged about in May.


 Love,
Love,
Jamiegoof
Hi Sis,
Evelyn actually fits in one of the outfits I made her!!! Naturally, I had to dress her up and do a photo shoot. This is the Best Sunday Baby Dress that I made and blogged about in May.
Love,
Jamiegoof
Hi Sis,
This month has gone by quickly, and I have very few blog posts! My days have mostly been filled getting very little done, outside of laundry, washing dishes, eating, and of course playing and caring for Evelyn.
It is crazy to think she is already a month old. She might be just a baby, be we are starting to learn Evelyn’s likes and dislikes, and she definitely knows her mommy and daddy now.
This morning while nursing Evelyn, Nate gets up for work. Evelyn gave him the most darling smile and reached her hand out to him. She also enjoys staring at us while we are talking, smiling, and on an occasion we get some giggles.
As for what she likes, food, sleep, rattles, being held, diaper changes, swinging, bouncing, being outside, and music. She is particularly fond of Enya, and my singing… sorry Nate!
Evelyn has a few dislikes too. Dirty diapers! She will cry and fuss up a storm till she is headed in the direction of the changing table. She also cries evertime she gets hiccups, poor girl!
Well, time for pictures 😀


Love,
Jamiegoof
Dear Sis,
Friday was a big day. We woke at 4:30 am, left the house at 5:30 am, so we could take off at 6:30. It was William’s first airplane ride. He was very eager to go, go, go!
Go Go Go Prepare for Take Off Movie

It was a three hour flight to a local airport near Oshkosh, Wisconsin. From there, we caught a shuttle to the air show. Since we had such an early morning we were ready for lunch upon arrival.

Since we were in Wisconsin, we had to get fried cheese curds to go with our ordinary burgers and hot dogs:) Think fried mozzarella cheese, but yummier!

After lunch, we checked out as many expo tents and tables as we could before William had had his fill.

Then, Daddy and cousin Blue found us a good spot to watch the airshow while they did more exploring. William loved eating snacks, climbing in and out of his wagon, and watching all the stunt pilots.

Around 4 pm, the day caught up with William and he napped in the wagon, while we walked around and looked at airplanes.


The wagon Daddy got for the airshow is a great addition to our kiddo travel collection. It folds up smaller than our stroller and is more suited to a rapidly growing kiddo:)
After the airshow, we flew an hour to a good resting point in Illinois where we got a hotel room for the night. We completed the remaining 2 hours of the flight home the following day. He is a picture of William with his “Wee” arms, up and ready to fly:)

Not only is cousin Blue crazy for aviation, but William is trilled by it too. He even learned to say plane on the ride home! But, he still prefers to say, “Zoom Zoom” instead.
Love,
b
Dear Sis,
William is very partial to routine… especially at bedtime. We travel at least once a month and now that he is too big for many cribs and travel beds, I decided to go the sleeping bag route. I wanted to provide something he would want to climb into! He has been owl crazy for a couple of months… and I liked the idea of an Owl Sleep Sack. I found a great picture online to inspire my creative juices. This image is actually an American Girl doll sleeping bag:)


Finished Dimensions (30 x 60 inches, not including pillow)
2 yards fleece, striped (outer fabric)
5 yards broadcloth (lining)
2 yards flannel, dot (wings)
1 yard broadcloth (pillow sham)
White, yellow, and black broadcloth remnants (appliqué facial features)
double sided fusible interfacing, such as WonderUnder
standard pillow, 20 x 28 inches
20 inch zipper, matching lining fabric (sleep sack closure)
4 hooks and eyes (sham closure)
tissue paper and clear tape (pattern making)
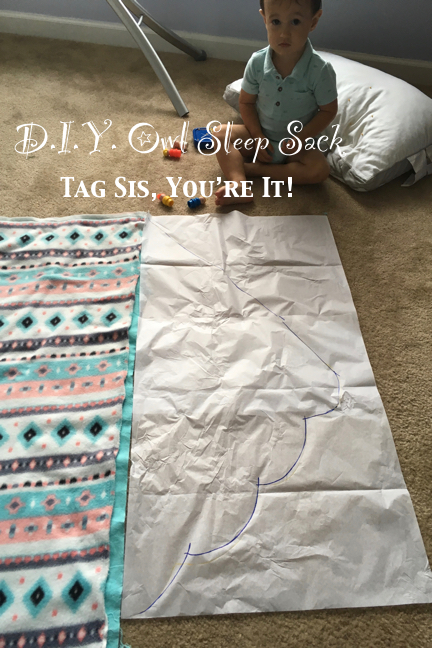


For even more satisfaction, have your local small person climb in and try it out:) My 20 month old son was full of hoo-hoos as he climbed in.

Happy Sewing,
b
Dear Sis,
We couldn’t find an Alphabet Soup recipe we loved, so we made our own! It is another great family meal for toddlers, kids, and parents:)

Pairs well with fresh baked biscuits, garlic toast, or buttered bread.
Love,
b
Dear Sis,
Today we made cookies so we could take them to the concert in the park later today. Sadly it got rained out, so we played for the duration instead.

Dear Sis,
The home we rented in Texas had one bath. Our new home has 2.5. It is great to have a second shower and three toilets! …but I really only had decor for one bath, which I put in our master bath since it matched best in that space.
Over the past six months I’ve slowly been decorating the second upstairs bath. Decorative towels was the last thing I needed! I found some perfect lace at Hobby Lobby the other day. William and I worked started the project together. He helped with the first towel, but lost interest, so I finished the other two after he went to bed for the night.

The finished set!

Since you are also a novice lace maker, I thought you’d enjoy a close up. It is a simple and fairly traditional Torchon lace pattern, though it is machine made.

Funny how such seemingly small details can make such a big difference!

Now I can move on to the next thing on my ever growing sewing list:)
Love,
b
Dear Sis,
After nap today, we set about making some peanut butter cookies to share at the library concert later in the evening. Besides, there was no Daddy home to be offended by our peanut butter party!

Gluten-Free Recipe: nobiggie.net

This is our third library concert. Another family has also gone to all the concerts. They have a little boy that was born just a week after William. The boys are drawn to one another. They share snacks, sippy-cups, and a secret language. I forgot to get a picture of William and Carter together, but I did get a picture of William sitting in the grass listening to the music.

I also got a video of William playing with a soon-to-be married couple. He took turns pushing down the plastic bubbles on their beverage lids, over and over again. After the concert, we spent some time talking to the young couple and I was thinking… gosh he looks familiar. It turns out he is the bass player from the library concert from last week. Small world!
Love,
b